|
|
|
|
 |
|
 |
BMW Garage | BMW Meets | Register | Today's Posts | Search |
 |

|
BMW 3-Series (E90 E92) Forum
>
DIY: e90 predator ICE
|
 |
| 01-05-2008, 07:52 AM | #1 |
|
G-MAN

44
Rep 241
Posts |
DIY: e90 predator ICE
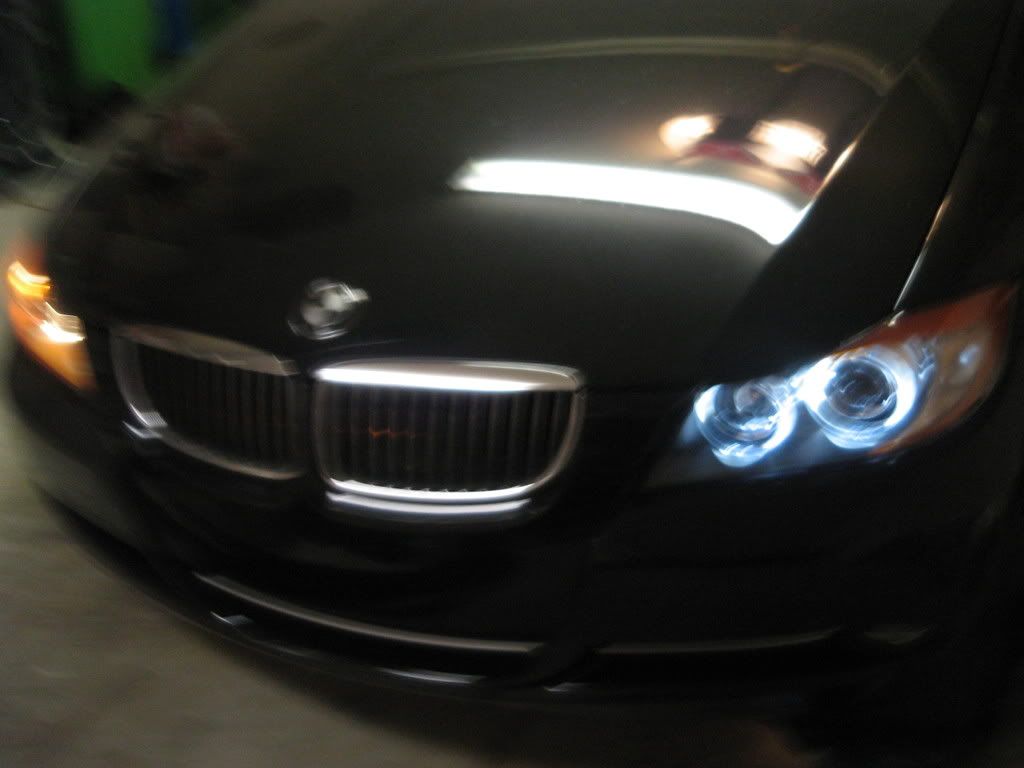
heres my DIY version with tips on the predator ICE from jlevisw.com. more affordable angel eyes upgrade with guaranteed fitment and no errors. theres two version of the ICE, mine is 3W and im happy with the white color and brightness.
you decide if you want to remove your FRT bumper or unscrew your fender liner, both procedures works, i took off my FRT bumper (additional 15 mins) because its easier and i can make sure that the seals, wiring, mounting are good. Last edited by sgt_gman2005; 04-05-2008 at 12:49 PM.. |
| 01-05-2008, 11:49 AM | #2 |
|
General
 
1569
Rep 29,202
Posts |
Nice DIY. It's what I've should have done when I installed mine.

__________________
 F10 520d M-Sport Alpine White | HRE P43SC 20x9+20x11 | Michelin PSS 255/35+295/30 | KW V3 Coilover | M5 Front Sway Bar + M550d Rear Sway Bar | 3DDesign Front Lip | BMW M Performance CF Spoiler | BMW M Performance Diffuser | BMW M Performance Black Grills | BMW M Performance Pedals | |
|
Appreciate
0
|
| 01-16-2008, 01:30 PM | #4 |
|
I F**KIN' Luv Coloring

35
Rep 504
Posts |
awesome ~~ thanks
__________________
 '06 Black Sapphire Metallic E90 / OEM M tech / 50% front & 20% rear tint / Rota Torque 18'x8.5 ET35 18'x9.5 ET30/ H&R Sport Spring / Black Matt Kidney Grill / Blackline Tail Light / Predator ICE Angel Eye / Eisenmann Quads http://www.e90post.com/forums/showthread.php?t=157780 |
|
Appreciate
0
|
| 01-16-2008, 01:50 PM | #5 |
|
Major

51
Rep 1,027
Posts |
wow, this is what we have to do to upgrade the angel eyes to super white etc?
As opposed to the coupe which only needs to replace a H8 simple bulb? Is what I understand here correct? sorry for the noob questions... |
|
Appreciate
0
|
| 01-16-2008, 05:13 PM | #6 | |
|
General
1569
Rep 29,202
Posts |
Quote:

__________________
F10 520d M-Sport Alpine White | HRE P43SC 20x9+20x11 | Michelin PSS 255/35+295/30 | KW V3 Coilover | M5 Front Sway Bar + M550d Rear Sway Bar | 3DDesign Front Lip | BMW M Performance CF Spoiler | BMW M Performance Diffuser | BMW M Performance Black Grills | BMW M Performance Pedals | |
|
|
Appreciate
0
|
| 01-18-2008, 10:41 AM | #7 |
|
Registered
2
Rep 3
Posts |
Just installed Angel Eyes upgrade kit
I purchased the Umnitza brand Angel Eyes LED upgrade kit from jlevisw.com and installed them a couple of days ago on my E90 (2006 330i). Here are the details:
We did the passenger side first and I would love to witness someone doing this replacement downward from the top of the engine. I know you can see and feel the angel eye housing unit from there, but replacing the bulb and getting a good seal on the gasket and working the screws is a whole other ballgame. I also read a thread whereas someone removed the front bumper to perform the replacement work. I did not see the benefit in this step at all (but that's just me). I found the job (both sides) extremely easy to do simply by removing the wheel-well liners, if that's the correct term, from the wheel wells. There are about 8-9 screws (phillips) and a couple of special "pins" that hold the liners on. These pins are NOT the one-time use pins that other makes/models have used in the past whereas once you pull them out, you have to buy and put new ones in. These pins were pulled out with a needle-nose pliers and went right back in without any difficulty or problems. Of the 8-9 screws overall on each side, there are 2-3 screws that go into the bottom of the bumper (closest to the wheel) that attach the liner to the bumper. These will need to be removed, as well. There are also "curb guards" on each side of the car and these will come off by removing three screws and one of the special aforementioned pins. Once you have the wheel liner off, the angel eye housing unit is staring you in the face and easily accessible. We did jack up the side of the car we were working on (one side at a time) so the housing unit was easier to work with (height factor) and we could easily lay under the car to remove the bumper screws and curb guard screws to get the liner off. Jacking up the car is not a requirement by any means; it accomplished three things in our opinion:
Instead of re-inventing the wheel (no pun intended), once you have the wheel liner off, refer to the above pictures by sgt_gman2005 to see the rest. One note...in pictures 4 & 5 above, it refers to the "black plastic shield". This part did NOT come out/off when we removed the OEM plastic cover (shown on the right in picture 3). It remained in the housing unit in the car. It wasn't actually attached to the old light and so the old light just came out by itself. If this happens with you, just put your hand back up in the housing unit where the old light bulb was and you'll find it. You need to get this piece out momentarily so you can remove the lense that is on it. On the old unit, there was just one bulb powering the device so I think this lense helped to distribute the light more evenly among the angel eyes since there are two on each side. Since the replacement unit has two bulbs, this lense is not needed. Anyone else share this opinion? In any case, once you have the lense removed, simply put the black unit back in place and it can only go in one way (dummy proof). After this, refer back to the pictures above and you're all set. I did NOT use the original screws because they are too long. Either use spacers or the 6 x 1 1/4 screws shown above. These worked great for me! There is no difference to the replacement on the driver side if you remove the wheel-well liner from that side, as well. Time spent: 90 minutes on the first (passenger) side. 20 minutes on the second (driver) side. Most of the 90 minutes on the first side were spent analyzing everything and double-checking the pictures to make sure we were doing the right thing at the right spot. I now feel like I could do the entire project (both sides) in 45 minutes or less. Thanks to everyone who contributed to this post and thanks to Nick at jlevisw for sending me this link. The support and response from jlevisw is wonderful. |
|
Appreciate
0
|
| 02-27-2008, 09:47 PM | #8 |
|
Captain

65
Rep 629
Posts |
sorry, what is FRT?
__________________
SG e90 | Black Dakota Leather | ZPP | ZSP | 19" BBS LM Reps | Steptronic
iDrive | Aluminum Trim | Xenon | CF Roundels | 15% Tint |
|
Appreciate
0
|
| 02-28-2008, 12:23 PM | #10 | |
|
General
1569
Rep 29,202
Posts |
Quote:
__________________
F10 520d M-Sport Alpine White | HRE P43SC 20x9+20x11 | Michelin PSS 255/35+295/30 | KW V3 Coilover | M5 Front Sway Bar + M550d Rear Sway Bar | 3DDesign Front Lip | BMW M Performance CF Spoiler | BMW M Performance Diffuser | BMW M Performance Black Grills | BMW M Performance Pedals | |
|
|
Appreciate
0
|
| 04-02-2008, 11:15 PM | #15 | |
|
Lieutenant
37
Rep 405
Posts |
Thanks for the guide. Installed mine tonight. by removing the wheel liner. Took about...7x longer than I expected because I didn't jack it up, so I couldn't see easily (a must when you're doing something for the first time).
If I were to do it again, i'd take no longer than 1 hour. Tonight...I don't even want to mention how long it took. just glad it's done. And yes, they look fantastic. Like they should have always looked.
__________________
Quote:
|
|
|
Appreciate
0
|
| 04-11-2008, 11:23 PM | #16 |
|
Colonel
148
Rep 2,368
Posts |
had alot of trouble.
took me 3 hrs just to do one side and still have trouble. for picture #4 do u take off the thing on the bottom as in you dont put it on with the ice. because I put it on and just closed it with 2 screws and they arent shut correctly. i will post picture later. my left turn signal isnt working now. what can i do to fix it? Is it something I didn't tighten? |
|
Appreciate
0
|
| 04-12-2008, 06:18 AM | #17 | |
|
General
1569
Rep 29,202
Posts |
Quote:
__________________
F10 520d M-Sport Alpine White | HRE P43SC 20x9+20x11 | Michelin PSS 255/35+295/30 | KW V3 Coilover | M5 Front Sway Bar + M550d Rear Sway Bar | 3DDesign Front Lip | BMW M Performance CF Spoiler | BMW M Performance Diffuser | BMW M Performance Black Grills | BMW M Performance Pedals | |
|
|
Appreciate
0
|
| 04-12-2008, 12:49 PM | #19 | |
|
General
1569
Rep 29,202
Posts |
Quote:
__________________
F10 520d M-Sport Alpine White | HRE P43SC 20x9+20x11 | Michelin PSS 255/35+295/30 | KW V3 Coilover | M5 Front Sway Bar + M550d Rear Sway Bar | 3DDesign Front Lip | BMW M Performance CF Spoiler | BMW M Performance Diffuser | BMW M Performance Black Grills | BMW M Performance Pedals | |
|
|
Appreciate
0
|
| 04-12-2008, 01:06 PM | #20 |
|
Colonel
148
Rep 2,368
Posts |
oh, dont use the metal thing? so I basically take everything thats stock off? such as dont use the black plastic angel eye cover. I take off angel eye cover, the bulb, and the whole lens? Everything is off that means just the new UNIT with the 2 circle bulb looking thingy?
|
|
Appreciate
0
|
| 04-12-2008, 02:33 PM | #21 | |
|
General
1569
Rep 29,202
Posts |
Quote:
__________________
F10 520d M-Sport Alpine White | HRE P43SC 20x9+20x11 | Michelin PSS 255/35+295/30 | KW V3 Coilover | M5 Front Sway Bar + M550d Rear Sway Bar | 3DDesign Front Lip | BMW M Performance CF Spoiler | BMW M Performance Diffuser | BMW M Performance Black Grills | BMW M Performance Pedals | |
|
|
Appreciate
0
|
 |
| Bookmarks |
|
|


 ANOTHER CLASSIC